
Using Remote Desktop with Windows XP Professional
In this article we will cover the use of Remote Desktop, a tool that once mastered can help you to connect over the network to remote servers to perform maintenance or to launch tests from. This article will cover the basic setup and use of it.
This will be important when we talk about Windows based networking services and how to set them up remotely, like Network Monitor for example. You could set up a remote Windows Server with Network Monitor, remotely control it via Remote Desktop and watch the packets flow over the wire from your VPN at home! Remote Desktop is definitely a tool you will want to master the use of.
What is Remote Desktop?
With the Remote Desktop feature in Windows XP, you can remotely control a computer from another office, from home, or while traveling. This allows you to use the data, applications, and network resources that are on your office computer, without being in your office. In the Illustration below, you can see that an Systems Administrator can quickly (and securely) get into their corporate offices and do that, system down, no problem, you can fix from anywhere you can find an Internet connection that is stable enough to let you work.

Remote Desktop is the new name for the older Windows based Terminal Services Client that (like with Windows 2000), would allow you to connect to and manage a server remotely for up to two connections, allowing you to do maintenance on the server and so on. Remote Desktop (Windows Server 2003 / XP), allows the same functionality, except it's enhanced and easier to use.
To use Remote Desktop, you need the following:
* Windows XP Professional installed on your office computer, or whichever computer you plan to operate remotely. This computer is known as the host. This article was written using Microsoft’s most current operating system – Windows XP Professional.
* Display data and keyboard data are sent over a WAN or Internet connection so make sure that you are working over a good connection… to use Remote Desktop over a slow connection could be a burden. It will work, but it may not respond as well as you would like. You can use low bandwidth connections, it will allow you to remotely control a system.
Get Remote Desktop
* The Remote Desktop Connection software is pre-installed with Windows XP so to verify that you have it, use the following URL:
o Start => All Programs => Accessories => Communications, => Remote Desktop Connection
* If you don’t have it, then you need to get it. There are options. First, you can get the Remote Desktop Connection software on the Windows XP Professional and Windows XP Home Edition product CDs
* If you don’t have a CD, then you can get it online. Use the links I provided in the links and references section to get the clients if you don’t have it currently available on your system.
The Remote Desktop Connection software can be installed on any supported Windows platform. One you get it, install it and open it up.
Let’s look at how install Remote Desktop (if not already installed)
Install the Client Software
To install Remote Desktop Connection software on a client computer
1. Insert the Windows XP CD into your CD-ROM drive.
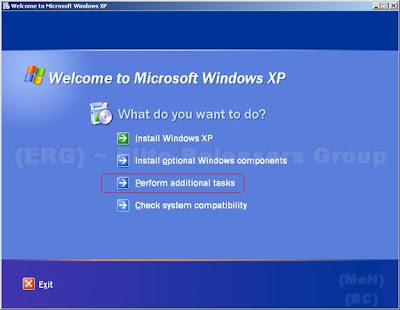
2. When the Welcome page appears, click Perform additional tasks, and then click Setup Remote Desktop Connection as shown below.


To use Remote Desktop, you need the following:
* Windows XP Professional installed on your office computer, or whichever computer you plan to operate remotely. This computer is known as the host. This article was written using Microsoft’s most current operating system – Windows XP Professional.
* Display data and keyboard data are sent over a WAN or Internet connection so make sure that you are working over a good connection… to use Remote Desktop over a slow connection could be a burden. It will work, but it may not respond as well as you would like. You can use low bandwidth connections, it will allow you to remotely control a system.
Get Remote Desktop
* The Remote Desktop Connection software is pre-installed with Windows XP so to verify that you have it, use the following URL:
o Start => All Programs => Accessories => Communications, => Remote Desktop Connection
* If you don’t have it, then you need to get it. There are options. First, you can get the Remote Desktop Connection software on the Windows XP Professional and Windows XP Home Edition product CDs
* If you don’t have a CD, then you can get it online. Use the links I provided in the links and references section to get the clients if you don’t have it currently available on your system.
The Remote Desktop Connection software can be installed on any supported Windows platform. One you get it, install it and open it up.
Let’s look at how install Remote Desktop (if not already installed)
Install the Client Software
To install Remote Desktop Connection software on a client computer
1. Insert the Windows XP CD into your CD-ROM drive.
2. When the Welcome page appears, click Perform additional tasks, and then click Setup Remote Desktop Connection as shown below.


3. When the installation wizard starts, follow the directions that appear on your screen.
4. You will have to agree to the license agreement
4. You will have to agree to the license agreement

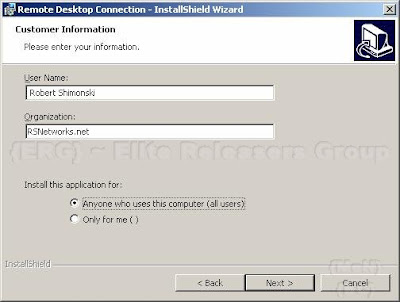
5. Enter your personal information and click Next
6. Finish the installation and you will now have Remote Desktop Installed on your XP system.
Enable Your Computer as the Host
Before you use Remote Desktop, your systems have to be set up properly to allow it to be ‘controlled’. One of the first things you will need to do is to ‘enable’ the remote control of a system. To do that, you will need to make a quick setting change in the System Properties.
1. Log in as an Administrator (or as a member of the Administrators group)
2. Open the System Applet in the Control Panel.
3. Click Start => Control Panel => System Applet => Remote Tab
6. Finish the installation and you will now have Remote Desktop Installed on your XP system.
Enable Your Computer as the Host
Before you use Remote Desktop, your systems have to be set up properly to allow it to be ‘controlled’. One of the first things you will need to do is to ‘enable’ the remote control of a system. To do that, you will need to make a quick setting change in the System Properties.
1. Log in as an Administrator (or as a member of the Administrators group)
2. Open the System Applet in the Control Panel.
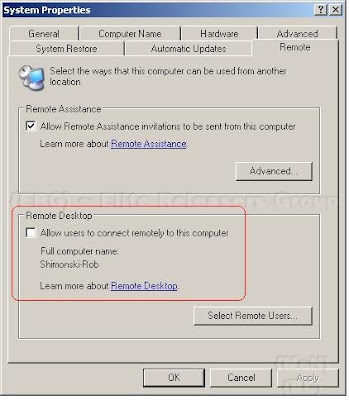
3. Click Start => Control Panel => System Applet => Remote Tab

4. On the Remote tab, select the Allow users to connect remotely to this computer check box, as shown below.

5. Make sure that you have the proper permissions to connect to a computer remotely, and click OK.
Remote Desktop and XP Service Pack 2
If you're running Windows XP Service Pack 2 (SP2) and you enable Remote Desktop, Windows Firewall will be automatically configured to allow Remote Desktop connections to your computer. There is one exception; this will not happen unless you have the Windows Firewall configured to allow no exceptions.
To allow exceptions in Windows Firewall:
1. Open the Control Panel, Double Click the Security Center applet

2. When the Security Center opens, Click on Windows Firewall

3. Make sure you Clear the check box next to “Don't allow exceptions”

Start a Session
Once you have enabled your Windows XP Professional computer to allow remote connections, and installed client software on a Windows-based client computer, you are ready to start a Remote Desktop session.
Remember, as I laid out in the diagram in the beginning of this article, you must first establish a virtual private network (VPN) connection or remote access service (RAS) connection from your client computer to your office network. Without a connection ‘into’ the corporate network, you will not be able to remote a server, especially if its not internet facing *like on a DMZ* and using a private RFC 1918 address.
To create a new Remote Desktop Connection
1. Open Remote Desktop Connection.
2. Click Start => All Programs => Accessories => Communications => Remote Desktop Connection
3. In Computer, type the computer name or TCP/IP (shown below) address of the host you want to control… remember, they have to be ‘allowed’ to be controlled first.
4. Fill in your credentials, Domain if needed, save the connection as a ‘profile’ so you can quickly go back to it later and use it again.

5. I don’t recommend checking the ‘Save my password’ check box because if your system becomes compromised, your servers (or other systems) have now become exposed to the Hacker. Now in the server, the whole corporate network is potentially exposed.
6. Once you have put in your credentials and all other pertinent information, Click Connect.
7. Your request will now be sent to the system you want to connect to. The Log On to Windows dialog box appears.
8. In the Log On to Windows dialog box, type your user name, password, and domain (if required), and then click OK.
9. The Remote Desktop window will open and you will see the desktop settings, files, and programs that are the system. The system that is in the corporate network can remain locked and safe while you are now inside it, working on it. Whatever you are doing cannot be seen by someone watching the console.
10. Problems do occur, most commonly it’s just that the connection is either refused or it timed out because of latency. Here is a commonly seen error message:

Note:
To change your connection settings, (such as screen size, automatic logon information, and performance options), click on the other tabs available when you open the Remote Desktop Client.
To open a saved connection
1. Saved connections are stored in you’re my Documents folder
2. Windows Explorer => My Documents folder
3. Click the .Rdp file for the connection you want to use
A Remote Desktop file (*.rdp) file is a profile that holds a bunch of settings. You can make copies of them as you would any other file and just change the options internally to that profile and save it with another name. You can copy all the *.rdp files and store them in a folder on your desktop; you can even edit the Start Menu and make a folder called RDP with all your profiles in it. Whatever makes it easy for you to manage…
To edit an *.rdp file and change the connections settings it contains, right-click the file and then click Edit.
To log off and end the session
1. In the Remote Desktop Connection window => click Start => Shut Down.
2. The Shut Down Windows dialog box appears
3. In the drop-down menu, select Log Off => click OK
Summary
In this article we covered the basics of Remote Desktop. We covered what its used for, how to install it, how to configure it and how to use it. Make sure you don’t leave this article out of your tool belt, in future articles you will see just how handy Remote Desktop can be.
This tutorial found through keywords:
Remote Desktop and XP Service Pack 2
If you're running Windows XP Service Pack 2 (SP2) and you enable Remote Desktop, Windows Firewall will be automatically configured to allow Remote Desktop connections to your computer. There is one exception; this will not happen unless you have the Windows Firewall configured to allow no exceptions.
To allow exceptions in Windows Firewall:
1. Open the Control Panel, Double Click the Security Center applet
2. When the Security Center opens, Click on Windows Firewall

3. Make sure you Clear the check box next to “Don't allow exceptions”

Start a Session
Once you have enabled your Windows XP Professional computer to allow remote connections, and installed client software on a Windows-based client computer, you are ready to start a Remote Desktop session.
Remember, as I laid out in the diagram in the beginning of this article, you must first establish a virtual private network (VPN) connection or remote access service (RAS) connection from your client computer to your office network. Without a connection ‘into’ the corporate network, you will not be able to remote a server, especially if its not internet facing *like on a DMZ* and using a private RFC 1918 address.
To create a new Remote Desktop Connection
1. Open Remote Desktop Connection.
2. Click Start => All Programs => Accessories => Communications => Remote Desktop Connection
3. In Computer, type the computer name or TCP/IP (shown below) address of the host you want to control… remember, they have to be ‘allowed’ to be controlled first.
4. Fill in your credentials, Domain if needed, save the connection as a ‘profile’ so you can quickly go back to it later and use it again.

5. I don’t recommend checking the ‘Save my password’ check box because if your system becomes compromised, your servers (or other systems) have now become exposed to the Hacker. Now in the server, the whole corporate network is potentially exposed.
6. Once you have put in your credentials and all other pertinent information, Click Connect.
7. Your request will now be sent to the system you want to connect to. The Log On to Windows dialog box appears.
8. In the Log On to Windows dialog box, type your user name, password, and domain (if required), and then click OK.
9. The Remote Desktop window will open and you will see the desktop settings, files, and programs that are the system. The system that is in the corporate network can remain locked and safe while you are now inside it, working on it. Whatever you are doing cannot be seen by someone watching the console.
10. Problems do occur, most commonly it’s just that the connection is either refused or it timed out because of latency. Here is a commonly seen error message:

Note:
To change your connection settings, (such as screen size, automatic logon information, and performance options), click on the other tabs available when you open the Remote Desktop Client.
To open a saved connection
1. Saved connections are stored in you’re my Documents folder
2. Windows Explorer => My Documents folder
3. Click the .Rdp file for the connection you want to use
A Remote Desktop file (*.rdp) file is a profile that holds a bunch of settings. You can make copies of them as you would any other file and just change the options internally to that profile and save it with another name. You can copy all the *.rdp files and store them in a folder on your desktop; you can even edit the Start Menu and make a folder called RDP with all your profiles in it. Whatever makes it easy for you to manage…
To edit an *.rdp file and change the connections settings it contains, right-click the file and then click Edit.
To log off and end the session
1. In the Remote Desktop Connection window => click Start => Shut Down.
2. The Shut Down Windows dialog box appears
3. In the drop-down menu, select Log Off
Summary
In this article we covered the basics of Remote Desktop. We covered what its used for, how to install it, how to configure it and how to use it. Make sure you don’t leave this article out of your tool belt, in future articles you will see just how handy Remote Desktop can be.
This tutorial found through keywords:
Subscribe to:
Post Comments (Atom)


November 30, 2009 at 3:41 AM
In-built remote desktop solutions necessitate configuration for proper performance of remote tasks. This can be highly difficult if one is a novice, and frustrating if one is not an administrator, who generally is authorized to configure. Moreover, in-built solutions do not equip users with all the privileges for complete remote system control. A better alternative would be specialized Remote Access like RHUB http://www.rhubcom.com solutions, which are easy, fast, and highly secure, with advanced features that provide complete control of the remote system.
June 20, 2011 at 6:40 AM
Thanks for the clear explanation of Remote Desktop and its capabilities as well as directions for how to use it. On the other hand, I have to agree with Cannerald - these in-built remote desktop solutions can be tricky and may not allow the user to enjoy all the benefits of this type of program. I would recommend trying out some more specialized software as well.
Post a Comment