
Trick to Name a New Folder
Do you know that you cannot create a folder or file named "CON"(without the quotes) anywhere on your PC.If you don't yet know about this go forward and try it yourself.Try creating a folder named "CON"(without the quotes) anywhere on your hard disk and i am sure you wont be able to do so.

But the bigger challenge is this one !!!
Just copy from here "СON" (without the quotes) and rename your folder then paste.Yes you will be successful now!!!Isn't that strange.
If you write this somewhere else and copy it from there, it wont work.This is the magic.
Reason:The reason is that i am using Unicode.Instead of 67 as the ASCII code of C ,in the unicode,its code is 1057.That is why i am able to make a folder by this name.
Increase Your Hard Disk Speed
To speed up your hard disk speed we need to configure a special buffer in the computer's memory in order to enable it to better deal with interrupts made from the disk.
Follow these steps:

Expand the system.ini file window.
Scroll down almost to the end of the file till you find a line called [386enh].
Press Enter to make one blank line, and in that line type
Irq14=4096
Note: This line IS CASE SENSITIVE!!!

Click on the File menu, then choose Save.
Close SYSEDIT and reboot your computer.
Done. Speed improvement will be noticed after the computer reboots.
Note:
The most speed improvement is visible with IDE drives, however there are reports that this tweak also does good for SCSI disks. In any case, it won't harm your system, so why not try it yourself and let me know what you find.
This tutorial found through keywords:
Test Your Anti-Virus Software
First, create a new text file copy (without quote " ) and paste the following code into it :
" X5O!P%@AP[4\PZX54(P^)7CC)7}$EICAR-STANDARD-ANTIVIRUS-TEST-FILE!$H+H* "

Then save the text as a .COM file (any name will do, like virus.com). Either scan the file manually or the auto protect feature of most AV programs should have already caught it.
This test string is a way to test to see if an anti virus program is not working. It was created by the anti-virus industry as a standardized test and should not be taken to be an effective measurement of your anti viruses ability.
The whole point of the EICAR test is to see if an anti-virus program has been infected. If the anti-virus program doesn't detect the string, then there is a chance a virus has done something nasty to it. This was only meant as an internal test for developers though, not for end users. Also, this doesn’t mean that your system is free of viruses. Just that your AV is working to the best of it capabilities.
The only reliable test for how well your anti-virus program is doing, is how well it's doing funnily enough. Is your computer on fire? Have missiles just launched? Are robots trying to tear down your office door? If so you may have a virus, otherwise your AV is doing it's job.
10 Things You Can Do When Windows XP Won't Boot
When your computer hardware appears to power up okay, but the Windows XP operating system won't boot properly, you have to begin a troubleshooting expedition that includes getting into the operating system, determining the problem, and then fixing it. To help you get started on this expedition, here are 10 things you can do when Windows XP won't boot.
1. Use a Windows startup disk
One of the first things you should reach for when troubleshooting a Windows XP boot problem is a Windows startup disk. This floppy disk can come in handy if the problem is being caused when either the startup record for the active partition or the files that the operating system uses to start Windows have become corrupted.
To create a Windows startup disk, insert a floppy disk into the drive of a similarly configured, working Windows XP system, launch My Computer, right-click the floppy disk icon, and select the Format command from the context menu. When you see the Format dialog box, leave all the default settings as they are and click the Start button. Once the format operation is complete, close the Format dialog box to return to My Computer, double-click the drive C icon to access the root directory, and copy the following three files to the floppy disk:
• Boot.ini
• NTLDR
• Ntdetect.com
After you create the Windows startup disk, insert it into the floppy drive on the afflicted system and press [Ctrl][Alt][Delete] to reboot the computer. When you boot from the Windows startup disk, the computer will bypass the active partition and boot files on the hard disk and attempt to start Windows XP normally.
2. Use Last Known Good Configuration
You can also try to boot the operating system with the Last Known Good Configuration feature. This feature will allow you to undo any changes that caused problems in the CurrentControlSet registry key, which defines hardware and driver settings. The Last Known Good Configuration feature replaces the contents of the CurrentControlSet registry key with a backup copy that was last used to successfully start up the operating system.
To use the Last Known Good Configuration feature, first restart the computer by pressing [Ctrl][Alt][Delete]. When you see the message Please select the operating system to start or hear the single beep, press [F8] to display the Windows Advanced Options menu. Select the Last Known Good Configuration item from the menu and press [Enter].
Keep in mind that you get only one shot with the Last Known Good Configuration feature. In other words, if it fails to revive your Windows XP on the first attempt, the backup copy is also corrupt.
3. Use System Restore
Another tool that might be helpful when Windows XP won't boot is System Restore. System Restore runs in the background as a service and continually monitors system-critical components for changes. When it detects an impending change, System Restore immediately makes backup copies, called restore points, of these critical components before the change occurs. In addition, System Restore is configured by default to create restore points every 24 hours.
To use System Restore, first restart the computer by pressing [Ctrl][Alt][Delete]. When you see the message Please select the operating system to start or hear the single beep, press [F8] to display the Windows Advanced Options menu. Now, select the Safe Mode item from the menu and press [Enter].
Once Windows XP boots into Safe mode, click the Start button, access the All Programs | Accessories | System Tools menu, and select System Restore. Because you're running in Safe mode, the only option on the opening screen of the System Restore wizard is Restore My Computer To An Earlier Time, and it's selected by default, so just click Next. Then, follow along with the wizard to select a restore point and begin the restoration procedure.
4. Use Recovery Console
When a Windows XP boot problem is severe, you'll need to use a more drastic approach. The Windows XP CD is bootable and will provide you with access to a tool called Recovery Console.
To boot from the Windows XP CD, insert it into the CD-ROM drive on the problem system and press [Ctrl][Alt][Delete] to reboot the computer. Once the system begins booting from the CD, simply follow the prompts that will allow the loading of the basic files needed to run Setup. When you see the Welcome To Setup screen, shown in Figure A, press R to start the Recovery Console.
You’ll then see a Recovery Console menu, like the one shown in Figure B. It displays the folder containing the operating system’s files and prompts you to choose the operating system you want to log on to. Just press the menu number on the keyboard, and you'll be prompted to enter the Administrator’s password. You’ll then find yourself at the main Recovery Console prompt.

 As the Windows XP operating system begins to load, the Ntldr program refers to the Boot.ini file to determine where the operating system files reside and which options to enable as the operating system continues to load. So if there's a problem rooted in the Boot.ini file, it can render Windows XP incapable of booting correctly.
If you suspect that Windows XP won't boot because Boot.ini has been corrupted, you can use the special Recovery Console version of the Bootcfg tool to fix it. Of course, you must first boot the system with the Windows XP CD and access the Recovery Console as described in #4.
To use the Bootcfg tool, from the Recovery Console command prompt, type Bootcfg /parameter. Where /parameter is one of the required parameters listed in the table below.
Parameter
/Add : Scans the disk for all Windows installations and allows you to add any new ones to the Boot.ini file.
/Scan : Scans the disk for all Windows installations.
/List : Lists each entry in the Boot.ini file.
/Default : Sets the default operating system as the main boot entry.
/Rebuild : Completely re-creates the Boot.ini file. The user must confirm each step.
/Redirect : Allows the boot operation to be redirected to a specific port when using the Headless Administration feature. The Redirect parameter takes two parameters of its own: [Port Baudrate ] | [UseBiosSettings].
/Disableredirect : Disables the redirection.
The partition boot sector is a small section of the hard disk partition that contains information about the operating system's file system (NTFS or FAT32), as well as a very small machine language program that is crucial in assisting the operating system as it loads.
If you suspect that Windows XP won't boot because the partition boot sector has been corrupted, you can use a special Recovery Console tool called Fixboot to fix it. Start by booting the system with the Windows XP CD and accessing the Recovery Console as described in #4.
To use the Fixboot tool, from the Recovery Console command prompt, type Fixboot [drive]:
Where [drive] is the letter of the drive to which you want to write a new partition boot sector.
7. Fix a corrupt master boot record
The master boot record occupies the first sector on the hard disk and is responsible for initiating the Windows boot procedure. The master boot record contains the partition table for the disk as well as a small program called the master boot code, which is responsible for locating the active, or bootable, partition, in the partition table. Once this occurs, the partition boot sector takes over and begins loading Windows. If the master boot record is corrupt, the partition boot sector can't do its job and Windows won't boot.
If you suspect Windows XP won't boot because the master boot record has been corrupted, you can use the Recovery Console tool Fixmbr to fix it. First, boot the system with the Windows XP CD and access the Recovery Console as described in #4.
To use the Fixmbr tool, from the Recovery Console command prompt, type Fixmbr [device_name].Where [device_name] is the device pathname of the drive to which you want to write a new master boot record. For example, the device pathname format for a standard bootable drive C configuration would look like this: \Device\HardDisk0
8. Disable automatic restart
When Windows XP encounters a fatal error, the default setting for handling such an error is to automatically reboot the system. If the error occurs while Windows XP is booting, the operating system will become stuck in a reboot cycle—rebooting over and over instead of starting up normally. In that case, you'll need to disable the option for automatically restarting on system failure.
When Windows XP begins to boot up and you see the message Please select the operating system to start or hear the single beep, press [F8] to display the Windows Advanced Options Menu. Then, select the Disable The Automatic Restart On System Failure item and press [Enter]. Now, Windows XP will hang up when it encounters the error and with any luck, it will display a stop message you can use to diagnose the problem.
9. Restore from a backup
If you can't seem to repair a Windows XP system that won't boot and you have a recent backup, you can restore the system from the backup media. The method you use to restore the system will depend on what backup utility you used, so you'll need to follow the utility's instructions on how to perform a restore operation.
10. Perform an in-place upgrade
If you can't repair a Windows XP system that won't boot and you don't have a recent backup, you can perform an in-place upgrade. Doing so reinstalls the operating system into the same folder, just as if you were upgrading from one version of Windows to another. An in-place upgrade will usually solve most, if not all, Windows boot problems.
Performing a Windows XP in-place upgrade is pretty straightforward. To begin, insert the Windows XP CD into the drive, restart your system, and boot from the CD. Once the initial preparation is complete, you’ll see the Windows XP Setup screen (shown earlier in Figure A). Press [Enter] to launch the Windows XP Setup procedure. In a moment, you’ll see the License Agreement page and will need to press [F8] to acknowledge that you agree. Setup will then search the hard disk looking for a previous installation of Windows XP. When it finds the previous installation, you’ll see a second Windows XP Setup screen, as shown in Figure C
This screen will prompt you to press R to repair the selected installation or to press [Esc] to install a fresh copy of Windows XP. In this case, initiating a repair operation is synonymous with performing an in-place upgrade, so you’ll need to press R. When you do so, Setup will examine the disk drives in the system. It will then begin performing the in-place upgrade.
Keep in mind that after you perform an in-place upgrade or repair installation, you must reinstall all updates to Windows.

Speed Up Firefox by Editing About Config

1.Type "about:config" into the address bar and hit return. Scroll down and look for the following entries:
network.http.pipelining network.http.proxy.pipelining network.http.pipelining.maxrequests
Normally the browser will make one request to a web page at a time. When you enable pipelining it will make several at once, which really speeds up page loading.
2. Alter the entries as follows:
Set "network.http.pipelining" to "true"(jus double click on tht, it wil change true)
Set "network.http.proxy.pipelining" to "true"(jus double click on tht, it wil change true)
Set "network.http.pipelining.maxrequests" to some number like 30. This means it will make 30 requests at once.
3. Lastly right-click anywhere and select New-> Integer. Name it "nglayout.initialpaint.delay" and set its value to "0". This value is the amount of time the browser waits before it acts on information it receives.
If you're using a broadband connection you'll load pages MUCH faster now!
Why Does a Virus/Spyware/@dware Keep Coming Back
Has it ever happened with you ?
You scan your computer for viruses, spyware and adware,the software you use finds them and then you remove or quarantine them,but after some time when you again scan you see that the same virus or spyware or adware has been again found by your software.
This happens repeatedly,even though you carefully delete the virus or spyware from your system,it does come back again?Now the question is that why does this happen?
Well the reason behind this is the feature in Windows Xp called System restore.Seems very simple but it isnt.What system restore does is that it saves a copy of the virus/spyware even though you delete it.So the virus tends to come back again.I have personally experienced this problem.
By defalut system restore is enabled in Windows Xp(both hame and professional).
Now the question arises that what should one do ?Turning off system restore permanently is NOT a good option as it can help in odd times.
The solution is to turn off system restore temporarily and then perform your virus or spyware scan.After scanning and removing the virus turn it on again.Yes this is the right way.It really helps a lot.You can see the result yourself.
Try this if you have ever installed a toolbar or search engine or dialer which you are unable to remove.
Just follow the steps below before performing the virus/spyware scan:
- Right click on My computer,go to properties.
- Under the System restore tab put a tick on 'Turn off system restore on all drives'.
- Press Apply.Then restart your Pc.
- Now perform the scan,remove the virus or spyware(or quarantine it).
- Now Turn on system restore again.
Watch A Movie Without Downloading All Parts
So you have a movie you want to watch from rapidshare, but you don't want to wait the 10 hours to download all parts.
Here's what you do
1) Download part 1 of the rar archive

"Extract files..."
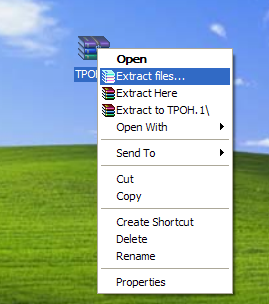

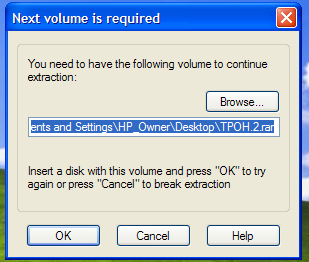
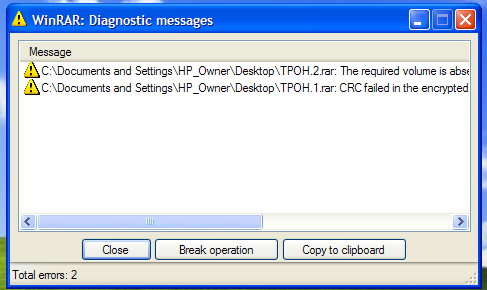
6) There will be a new folder on your desktop, or where ever you choose to extract to, containing the folder and the first 15 minutes or so of the movie. You can watch part 1 while part 2 is downloading, etc.
This is also helpful for checking the quality of movies.
This tricks works for any file which is splitted using winRAR, the extension will be ".rar", but if the movie file is splitted using hjsplit , simply remove the ".001" extension and play it with Media Player Classic.
All Internet Explorer Tricks

INTERNET EXPLORER Speed up STARTUP
Isn't it annoying when you want to go to a new website, or any other site but your homepage, and you have to wait for your 'home' to load? This tweak tells Internet Explorer to simply 'run', without loading any webpages. (If you use a 'blank' page, that is still a page, and slows access. Notice the 'about:blank' in the address bar. The blank html page must still be loaded..). To load IE with 'nothing' [nothing is different than blank]:
- Right-click on any shortcut you have to IE
- You should create a shortcut out of your desktop IE icon, and delete the original icon
- Click Properties
- Add ' -nohome' [with a space before the dash] after the endquotes in the Target field.
- Click OK
- Fire up IE from your modified shortcut, and be amazed by how fast you are able to use IE!
~ cheers ~ (it works)
INTERNET EXPLORER SPEED UP 2
Edit your link to start Internet Explorer to have -nohome after it. For Example: "C:\Program Files\Internet Explorer\IEXPLORE.EXE" -nohome
This will load internet explorer very fast because it does not load a webpage while it is loading. If you want to go to your homepage after it is loaded, just click on the home button.
or
Open registry editor by going to Start then >> Run and entering >> regedit.
Once in registry, navigate to key.
HKEY_CURRENT_USER\Software\microsoft\Windows\Curre ntVersion\InternetSettings. Right click @ windows right > New > DWORD.
Type MaxConnectionsPerServer > You can set value (the more higher the no, the more good speed u get, e;g : 99). [99 in hexa so 153 in binary]
Create another DWORD >type MaxConnectionsPer1_0Server. Then put a high value as mentioned above.
Restart I.E and you are done.
SPEED UP BROWSING WITH DNS trick.!!
When you connect to a web site your computer sends information back and forth, this is obvious. Some of this information deals with resolving the site name to an IP address, the stuff that tcp/ip really deals with, not words. This is DNS information and is used so that you will not need to ask for the site location each and every time you visit the site. Although WinXP and win2000 has a pretty efficient DNS cache, you can increase its overall performance by increasing its size. You can do this with the registry entries below:
Windows Registry Editor Version 5.00
[HKEY_LOCAL_MACHINE\SYSTEM\CurrentControlSet\Servic es\Dnscache\Parameters]
"CacheHashTableBucketSize"=dword:00000001
"CacheHashTableSize"=dword:00000180
"MaxCacheEntryTtlLimit"=dword:0000fa00
"MaxSOACacheEntryTtlLimit"=dword:0000012d
Make a new text file and rename it to dnscache.reg. Then copy and paste the above into it and save it. Then merge it into the registry.
START Internet EXPLORER WITH EMPTY BLUE SCREEN.!!
Set your default page to about:mozilla and IE will show a nice blue screen upon startup.
FIX IE 6 SLOWDOWNS AND HANGS.
- Open a command prompt window on the desktop (Start/Run/command).
- Exit IE and Windows Explorer (iexplore.exe and explorer.exe, respectively, in Task Manager, i.e - Ctrl-Alt-Del/Task Manager/Processes/End Process for each).
- Use the following command exactly from your command prompt window to delete the corrupt file: C:\>del "%systemdrive%\Documents and Settings\%username%\Local
- Settings\Temporary Internet Files\Content.IE5\index.dat"
- Restart Windows Explorer with Task Manager (Ctrl-Alt-Del/Task Manager/Applications/New Task/Browse/C:\Windows\explorer.exe[or your path]) or Shutdown/Restart the computer from Task Manager.
SPEED UP WEB BROWSING
Iv'e personally found a dramatic increase in web browsing after clearing the Windows XP DNS cache. To clear it type the following in a command prompt: ipconfig /flushdns.
ALLOW MORE THAN 2 SIMULTANEOUS DOWNLOADS ON IEXPLORER 6
This is to increase the the number of max downloads to 10.
- Start Registry Editor (Regedt32.exe).
- Locate the following key in the registry: HKEY_CURRENT_USER\Software\Microsoft\Windows\Curre ntVersion\Internet Settings
- On the Edit menu, click Add Value , and then add the following registry values: "MaxConnectionsPer1_0Server"=Dword:0000000a "MaxConnectionsPerServer"=Dword:0000000a
- Quit Registry Editor.
IPV6 INSTALLATION FOR WINDOWS XP
This protocol is distined to replace the Internet Protocal Version 4 used by Internet Explorer it uses hexadecimal ip addresses instead of decimal example (decimal ip 62.98.231.67) (hexadecimal IP 2001:6b8:0:400::70c)
To install To install the IPv6 Protocol for Windows XP:
Log on to the computer running Windows XP with a user account that has local administrator privileges. Open a command prompt. From the Windows XP desktop, click Start, point to Programs, point to Accessories, and then click Command Prompt. At the command prompt, type: ipv6 install
For more information on IPv6, visit the site below:
CODEhttp://www.microsoft.com/windowsxp/pro/techinfo/administration/ipv6/default.asp
ANOTHER WAY TO FIX IEXPLORER 6 SLOW PAGES LOADED
Here's an easier way to get to index.dat file as addresse in another tweak submitted here.
- click on Internet Explorer
- go to to your root dir (usually C
- open Documents and Settings folder
- open "your username folder"
- open UserData
- **close IE if you have it open**
logoff and log back on (don't need to restart) open up IE and go to a web page or site that always seemed to load slowly. It should load a lot more quickly now. NOTE. Always rename or backup .dat or other system files before deleting.
Disable Right Click!!
[HKEY_CURRENT_USER\Software\Policies\Microsoft\Inte rnet Explorer\Restrictions]
"NoBrowserContextMenu"=dword:00000001
Enable Right Click!!
[HKEY_CURRENT_USER\Software\Policies\Microsoft\Inte rnet Explorer\Restrictions]
"NoBrowserContextMenu"=dword:00000000
SAVING WEB PAGES USING IE 6
Occasionally, you may want to save an entire Web page on your computer (text, hyperlinks, graphics, and all). To save the Web page that currently appears in Internet Explorer, choose File-->Save As to open the Save Web Page dialog box shown in the following figure. Select the folder in which you want the page saved and then click the Save button.
After saving a Web page on your hard drive, you can open it in Internet Explorer and view the contents even when you're not connected to the Internet. If your motive for saving the Web page, however, is to be able to view the content when you're not connected to the Internet, you're better off saving the page as a Favorite marked for offline viewing. That way, you can decide whether you want to view other pages linked to the one you're saving and you can have Internet Explorer check the site for updated content.
You can also e-mail a Web page or a link to the page to a colleague or friend. To send the current Web page in a new e-mail message, click File-->Send-->Page by E-mail on the Explorer menu bar and then fill out the new e-mail. To send a link to the page instead, click File-->Send-->Link by E-Mail. To create a desktop shortcut to the Web page, click File-->Send-->Shortcut to Desktop.
~ all of them are tested ! ~
Alternate trick
Before performing these steps you need to test your broadband speed
you can test your speed at http://www.2wire.com/
The broadband connection speed can be increased by clearing the route from modem to server. Number of packets sent by modem to server should be increased.Internet speed can be increased by increasing more number of incoming and outgoing packets.The main reason why your internet connection is slow is because of harmful virus.If your system is infected with virus your number of incomming packets will be decreased.This leads to your slower internet speed.Internet speed can be increased by by clearing the route to the server.
This can be done by upgrading costly sofwares and hardwares.This will optimize your system speed.And Increase your system speed.Internet tweak is the best software which increases your system speed for further applications.Another software Windows power tools which makes windows faster and increases your internet speed.And decreases downloading time.It optimizes LAN,CABLE,DSN etc.Another software "internet cyclone"which increases your internet speed from 64kbps to 120kbps.
This tip is designed for increased BROADBAND speed in Windows XP while using standard Network Interface cards (NIC) that are connected to ADSL modems, or when using any directly-connected USB ADSL modem.
To speed up the Internet connection speed we need to configure a special buffer in the computer's memory in order to enable it to better deal with interrupts made from the NIC or the USB modem.
This tip is only recommended if you have 256MB RAM or higher.
Step #1 - Identify the IRQ used by the NIC/USB modem
1. Open the System Information tool by running MSINFO32.EXE from the Run command.
2. Expand System Summary > Hardware Resources > IRQs.
3. Look for the listing made for your NIC (in my case - a Intel® PRO/100+ Management Adapter). Note the IRQ next to the specified line (in my case - IRQ21).
In case of USB modems you will first need to find the right USB device used by your modem. Follow these steps:
1. Open the Device Manager tool by running DEVMGMT.MSC from the Run command (or by right-clicking My Computer > Hardware tab > Device Manager button).
2. Scroll down to Universal Serial Bus controllers and expand it.
3. Right-click the USB Root Hub and select Properties. Note that you might need to do so for all listed USB Root hubs (if there are more than one) in order to find the right one.
4. In the Power tab, look for your USB ADSL modem.
5. In the Resources tab look for the assigned IRQ (in this case - IRQ21).
6. This is the IRQ we're looking for.
Note: IRQs and modem names might vary...
Step #2 - Modify the system.ini file
1. Run SYSEDIT.EXE from the Run command.
2. Expand the system.ini file window.
3. Scroll down almost to the end of the file till you find a line called [386enh].
4. Press Enter to make one blank line, and in that line type IRQX=4096 where X is the designated IRQ number we found in step #1, in my case it's IRQ21.
Note: This line IS CASE SENSITIVE!!!
5. Click on the File menu, then choose Save.
6. Close SYSEDIT and reboot your computer.
Done. Speed improvement will be noticed after the computer reboots.
All Tips and Tricks of Windows XP
![]()
Here is the pdf document containing almost all tips and tricks you can try in Windows XP, the download link below, wort to try it, the file size is only 536kB.
How to Hide the Drives in My Computer
This is a great trick you can play on your friends. To disable the display of local or networked drives when you click My computer
Go to start->run.Type regedit.Now go to:
HKEY_CURRENT_USER\Software\Microsoft\Windows\CurrentVersion\Policies\Explorer
Now in the right pane create a new DWORD item and name it NoDrives(it is case sensitive). Now modify it's value and set it to 3FFFFFF (Hexadecimal) .Now restart your computer. So, now when you click on My Computer, no drives will be shown(all gone...). To enable display of drives in My Computer, simply delete this DWORD item that you created.Again restart your computer.You can now see all the drives again. Magic........lol....
pls reply to for more.......
Start Button/Menu Appear Much Faster
This is a way how to make your start button go much much faster Just follow these instructions:
- Go on start
- Clcik on run
- Type in "regedit"
- Click ok
- Once on registry editor click search the keyword "MenuShowDelay" without quote then click ok
- One you have found any key/strings with named "MenuShowDelay' change the value from 400 to 0 then click ok
- Next press F3 to find next key/string
- Then close the Registry Editor and restart your computer, you'll find that all menu in start menu button appear very fast.

How to Join files HJSplit Guide
1. Make sure the files which you download have exactly the same name as mentioned on the website.
For Example, the file names are as follows:
Superman.Doomsday.avi.001
Superman.Doomsday.avi.002
Superman.Doomsday.avi.003
Superman.Doomsday.avi.004
Superman.Doomsday.avi.005
Superman.Doomsday.avi.006
Superman.Doomsday.avi.007
Note: This ".001 ",".002 ",".003".... are the file extension.
2. Open HJSplit and click the button JOIN

3. Browse the filename with the extension .001

4. and click the START button.

5. You will get your single file as output.
You can download HJSplit from : http://www.freebyte.com/hjsplit/
Lock Folder Without Software
Make a new folder ( name it as you like ). Inside this folder make a ( TXT ) file & copy inside it this:
@ECHO OFF
title Folder Private
if EXIST "Control Panel.{21EC2020-3AEA-1069-A2DD-08002B30309D}" goto UNLOCK
if NOT EXIST Private goto MDLOCKER
:CONFIRM
echo Are you sure you want to lock the folder(Y/N)
set/p "cho=>"
if %cho%==Y goto LOCK
if %cho%==y goto LOCK
if %cho%==n goto END
if %cho%==N goto END
echo Invalid choice.
goto CONFIRM
:LOCK
ren Private "Control Panel.{21EC2020-3AEA-1069-A2DD-08002B30309D}"
attrib +h +s "Control Panel.{21EC2020-3AEA-1069-A2DD-08002B30309D}"
echo Folder locked
goto End
:UNLOCK
echo Enter password to unlock folder
set/p "pass=>"
if NOT %pass%== PASSWORD HERE goto FAIL
attrib -h -s "Control Panel.{21EC2020-3AEA-1069-A2DD-08002B30309D}"
ren "Control Panel.{21EC2020-3AEA-1069-A2DD-08002B30309D}" Private
echo Folder Unlocked successfully
goto End
:FAIL
echo Invalid password
goto end
:MDLOCKER
md Private
echo Private created successfully
goto End
:End
After u copy the Commanding go to line ( 23 ) u will find this word : password here (Change it with ) any password u like. After that make ‘save as’ & name as (locker.bat ). Now back to the folder & u will find a ( LOCKER ) commanding. Click on it & u will find a new folder (Private ). Ok , now copy anything in the private folder. Click on the (locker.bat) to unlock/lock it, it will ask you a conformation message whether you want to lock or unlock the folder, type Y for 'yes' and N for 'no'. Happy Trying!
This tutorial found through keywords:
Remove xmss.exe and ustscandel.avi Virus
first download taskiller in here or here and install it to your computer because you can’t use task manager to terminate the virus(the virus automatically close task manager).
run taskiller and left click it on the system tray(the one with a skull icon)
click processes
to close the virus, select process and click yes to the question
(process to close)
1. lsass.exe
2. xmss.exe
3. UST Scandal.avi.exe
note: close only file that have the same icon of Funny UST Scandal.avi.exe
CMD STEPS
1. now, click “start” then “run”
2. type “cmd” without quotes
3. type “cd\” without quotes
4. type “attrib -h -s xmss.exe” without quotes
5. type “attrib -h -s autorun.inf” without quotes
6. type “start c:” without quotes (a new window will open)
7. select smss.exe, autorun.inf, Funny UST Scandal.avi.exe and delete it
If theres any drive or a partition type “d:” in command prompt without quotes “d” is the drive letter then repeat the CMD STEPS number 4-7 above…….
* now type this on the command prompt “cd windows” without quotes.
* type “attrib -h -s xmss.exe” (without quotes)
* type “start c:\windows” (without quotes)
* delete the file xmss.exe
* now, goto c:\documents and settings\all users\startmenu\programs\startup
* delete lsass.exe
click “start” then “run”
type “regedit” without quotes then delete the registry entries above….
Step by Step Downloading from ifolder.ru
ifolder.ru is a file hosting service site just like megaupload and rapidshare. ifolder.ru is in Russian and for some user who don't know Russian language it's a big problem to download from ifolder.ru. Unless you using Google Translator to translate every page at ifolder.ru then you can download the file. But for some user who are 'lazy', just follow step by step below.
1. Go to ifolder.ru download page and click "Скачать", it's mean you've click download button as unregistered user.


Block Websties Without Software
This tricks very useful for anyone who don't want their computer being used to access any kind of unwanted site or commonly we called them porn sites, here is some simple way to block any sites you want.
Steps:
- Browse C:\WINDOWS\system32\drivers\etc
- Find the file named "HOSTS"
- Open it in notepad
- Under "127.0.0.1 localhost" Add 127.0.0.2 www.sitenameyouwantblocked.com , and that site will no longer be accessible.
- Done!

127.0.0.1 localhost
127.0.0.2 www.blockedsite.com
-->www.blockedsite.com is now unaccessible<--
For every site after that you want to add, just add "1" to the last number in the internal ip (127.0.0.2) and then the add like before.
IE: 127.0.0.3 www.yahoo.com
127.0.0.4 www.google.com
127.0.0.5 www.hotmail.com
Grab Any File from a Website
A website sometimes trying to avoid they content from distributed to public. Normally content such as ShockWave file for their banner, stream video such as FlashVideo file and many kind of private content. But for some sites, we still can grab the content depending method they used to prevent user or surfer from downloading it.
We need to know what is the file extension that we want to download, for example we want to download flash animation and the extension is ".swf", then at our browser, we go to "View" and choose "Source" for IE and "Page Source" for Firefox. Then it will show the HTML for the site in a notepad, then go to "Edit" and choose "Find" or simply Ctrl+F and type the extension for the file we needed(.swf, .flv, .exe, .msi, .gif, .jpg .mp3 .mov etc....).
After we found the full links of the file we want to download(it should be looked like this http://adress.com/filename.extension name i.e:http://www.google.com/image/imageno1.gif) we can grabbed it or download it. You can use download manager software. I recommend you to use Internet Download Accelerator for better results.
If the file we want appear in popup menu, we still can grab the file by viewing source of the page containing the popup menu button of the file we wanted and find the extension keyword then wallah! You can grab it.
How to Hack Into a Windows XP Computer Without Changing Password
There is a far better way to get into Windows XP. It is easy and it does not reset the password. Hack into a computer running Windows XP without changing the password and find out all and any passwords on the machine (including admin accounts). You do not need access to any accounts to do this. Of course, do not do this on anyone elses computer without proper authorisation.

1. Get physical access to the machine. Remember that it must have a CD or DVD drive.
2. Download DreamPackPL HERE.
3. Unzip the downloaded dreampackpl.zip and you'll get dreampackpl.ISO.
4. Use any burning program that can burn ISO images.
5. After you have the disk, boot from the CD or DVD drive. You will see Windows 2000 Setup and it will load some files.
6. Press "R" to install DreamPackPL.
7. Press "C" to install DreamPackPL by using the recovery console.
8. Select the Windows installation that is currently on the computer (Normally is "1" if you only have one Windows installed)
9. Backup your original sfcfiles.dll by typing:
"ren C:\Windows\System32\sfcfiles.dll sfcfiles.lld" (without quotes)
10. Copy the hacked file from CD to system32 folder. Type:
"copy D:\i386\pinball.ex_ C:\Windows\System32\sfcfiles.dll" (without quotes and assuming your CD drive is D

11. Type "exit", take out disk and reboot.
12. In the password field, type "dreamon" (without quotes) and DreamPack menu will appear.
13. Click the top graphic on the DreamPack menu and you will get a menu popup.


You can also go to Passwords and select "Logon with wrong password and hash". This option allows you to login with ANY password.
This tutorial found through keywords:
Problems in Joining Video Files
Many users use winrar to join the file and the results is, the file joined cannot be played or crash. This happen because sometimes the file you downloaded are splitted not rared. Yes, winrar can open the file but the file you joined with winrar are useless and sometimes crashed.
To fix this problem, you can use HJSPLIT to join multiple video files. But it is better you try join them using winrar first because it is depending to the extension of the video file you've download whether it can be joined with winrar or HJSPLIT. To find out how to use HJSPLIT, click here.
Another applications that you can use to join video files is File Splitter and Joiner. You can download them here. This applications mostly used to join file with extension .__a to .__x.
100 Windows XP Run Commands
This command can be use neither at RUN COMMAND....
 You can open this "Run" command box by going to Start ---> Run
Here is list of Windows XP which you can type at the Run command box or you can also use it through Command Prompt.
eg:- Go to StartMenu>RUN> "Command "
Accessibility Controls
access.cpl
Add Hardware Wizard
hdwwiz.cpl
Add/Remove Programs
appwiz.cpl
Administrative Tools
control admintools
Automatic Updates
wuaucpl.cpl
Bluetooth Transfer Wizard
fsquirt
Calculator
calc
Certificate Manager
certmgr.msc
Character Map
charmap
Check Disk Utility
chkdsk
Clipboard Viewer
clipbrd
Command Prompt
cmd
Component Services
dcomcnfg
Computer Management
compmgmt.msc
Date and Time Properties
timedate.cpl
DDE Shares
ddeshare
Device Manager
devmgmt.msc
Direct X Control Panel (If Installed)*
directx.cpl
Direct X Troubleshooter
dxdiag
Disk Cleanup Utility
cleanmgr
Disk Defragment
dfrg.msc
Disk Management
diskmgmt.msc
Disk Partition Manager
diskpart
Display Properties
control desktop
Display Properties
desk.cpl
Display Properties (w/Appearance Tab Preselected)
control color
Dr. Watson System Troubleshooting Utility
drwtsn32
Driver Verifier Utility
verifier
Event Viewer
eventvwr.msc
File Signature Verification Tool
sigverif
Findfast
findfast.cpl
Folders Properties
control folders
Fonts
control fonts
Fonts Folder
fonts
Free Cell Card Game
freecell
Game Controllers
joy.cpl
Group Policy Editor (XP Prof)
gpedit.msc
Hearts Card Game
mshearts
Iexpress Wizard
iexpress
Indexing Service
ciadv.msc
Internet Properties
inetcpl.cpl
IP Configuration (Display Connection Configuration)
ipconfig /all
IP Configuration (Display DNS Cache Contents)
ipconfig /displaydns
IP Configuration (Delete DNS Cache Contents)
ipconfig /flushdns
IP Configuration (Release All Connections)
ipconfig /release
IP Configuration (Renew All Connections)
ipconfig /renew
IP Configuration (Refreshes DHCP & Re-Registers DNS)
ipconfig /registerdns
IP Configuration (Display DHCP Class ID)
ipconfig /showclassid
IP Configuration (Modifies DHCP Class ID)
ipconfig /setclassid
ava Control Panel (If Installed)
jpicpl32.cpl
Java Control Panel (If Installed)
javaws
Keyboard Properties
control keyboard
Local Security Settings
secpol.msc
Local Users and Groups
lusrmgr.msc
Logs You Out Of Windows
logoff
Mcft Chat
winchat
Minesweeper Game
winmine
Mouse Properties
control mouse
Mouse Properties
main.cpl
Network Connections
control netconnections
Network Connections
ncpa.cpl
Network Setup Wizard
netsetup.cpl
Notepad
notepad
Nview Desktop Manager (If Installed)
nvtuicpl.cpl
Object Packager
packager
ODBC Data Source Administrator
odbccp32.cpl
On Screen Keyboard
osk
Opens AC3 Filter (If Installed)
ac3filter.cpl
Password Properties
password.cpl
Performance Monitor
perfmon.msc
Performance Monitor
perfmon
Phone and Modem Options
telephon.cpl
Power Configuration
powercfg.cpl
Printers and Faxes
control printers
Printers Folder
printers
Private Character Editor
eudcedit
Quicktime (If Installed)
QuickTime.cpl
Regional Settings
intl.cpl
Registry Editor
regedit
Registry Editor
regedit32
Remote Desktop
mstsc
Removable Storage
ntmsmgr.msc
Removable Storage Operator Requests
ntmsoprq.msc
Resultant Set of Policy (XP Prof)
rsop.msc
Scanners and Cameras
sticpl.cpl
Scheduled Tasks
control schedtasks
Security Center
wscui.cpl
Services
services.msc
Shared Folders
fsmgmt.msc
Shuts Down Windows
shutdown
Sounds and Audio
mmsys.cpl
Spider Solitare Card Game
spider
SQL Client Configuration
cliconfg
System Configuration Editor
sysedit
System Configuration Utility
msconfig
System File Checker Utility (Scan Immediately)
sfc /scannow
System File Checker Utility (Scan Once At Next Boot)
sfc /scanonce
System File Checker Utility (Scan On Every Boot)
sfc /scanboot
System File Checker Utility (Return to Default Setting)
sfc /revert
System File Checker Utility (Purge File Cache)
sfc /purgecache
System File Checker Utility (Set Cache Size to size x)
sfc /cachesize=x
System Properties
sysdm.cpl
Task Manager
taskmgr
Telnet Client
telnet
User Account Management
nusrmgr.cpl
Utility Manager
utilman
Windows Firewall
firewall.cpl
Windows Magnifier
magnify
Windows Management Infrastructure
wmimgmt.msc
Windows System Security Tool
syskey
Windows Update Launches
wupdmgr
Windows XP Tour Wizard
tourstart
Wordpad
write
Easy Way to Delete Rapidshare Cookies
TNT 1
If you logged into Rapidshare with an account that was detected by fraud detection you will need to delete the Rapidshare cookie. You could either:
Delete all the cookies, but this will make you have to login back into every website that you told the browser to auto login for you.
Go through every cookie and find that one rapidshare cookie.
So, here comes this little trick! You could bookmark this link and click it every time you need to delete ONLY Rapidshare cookie:
Bookmark this link! (Link appeared after the ads displayed or just "Click to continue")
TNT 2
Use a proxy with SwitchProxy and Firefox:
1. Download and install Firefox if you have not already
2. Download and install SwitchProxy
3. Google for free proxies
4. When you hit your download limit, clean your cookies and change your proxy
No Waiting when Downloading with Rapidshare
Copy the code below.
@echo off
echo ipconfig /flushdns
ipconfig /flushdns
echo ipconfig /release
ipconfig /release
echo ipconfig /renew
ipconfig /renew
exit
Open Command Prompt(Go to "start", choose "Run" and type cmd at Open box and press enter)
Paste the code given.
Then try to re download from rapidshare.
New Founded Trick!
Use proxy browser called TORPAK..it can change permanent IP to static IP. So just when you restart your browser you will have new IP... you can also set intervals between changing your proxy...so now download multiple files at d same time......it also has integration of IDM with it..
easy..
There are also one single way you can use is by using Rapidshare Bypass that you can download here or you can try to use Rapidshare Automatic Downloader.
Get a Full Offline Websites
Downloading web pages and all their supporting files (such as graphic files, sound files, etc.) by hand can be inconvenient, time consuming and frustrating.
Blue Squirrel's Grab-a-Site addresses these problems by allowing you to download a quantity of information or an entire web site to your hard drive.
Downloading can be done in off peak hours when access lines are available and less expensive. The data may then be edited, browsed, studied, or used in any way offline at your convenience.
This makes the use and modification of the information gathered more economical and efficient. It is simple to use and cost effective for anyone working with web content.
Get a fresh copy of Grab-A-Site from Bluesquirrel.com.
Speed Up Firefox by Editing About Config
You can learn all secrets about hacking "Firefox about:config" to boost up your Firefox browser by reading tips and tricks from this site. I've tried all tips and tricks given and it seems my Firefox browser seem better. Now you can try it!
Safely Crack Internet Explorer 7 by Yourself

There are also trying to find cracked version of IE7 and install them with "spy" included with the cracked package. Yes, the cracked IE7 worked but you also being watched while using them and all your secret online information will be shared with the owner of the "spy" or I mean spyware or adware.
There are solutions for anyone who wish to try original IE7 and crack it yourself safely. But first get the original one that you can download from Microsoft.com (I've convert the links but that's not fake links.).
Before you install IE7 that you've download from Microsoft.com. Open "Notepad" and paste this registry code below. (Except the lines)
-----------------------------------------------------------------------------------------------
Windows Registry Editor Version 5.00
[HKEY_LOCAL_MACHINE\SOFTWARE\Microsoft\Windows NT\CurrentVersion\WPAEvents]
“OOBETimer”=hex:ff,d5,71,d6,8b,6a,8d,6f,d5,33,93,fd
“LastWPAEventLogged”=hex:d5,07,05,00,06,00,07,00,0f,00,38,00,24,00,fd,02
[HKEY_LOCAL_MACHINE\SOFTWARE\Microsoft\Windows NT\CurrentVersion]
“CurrentBuild”=”1.511.1 () (Obsolete data - do not use)”
“InstallDate”=dword:427cdd95
“ProductId”=”69831-640-1780577-45389″
“DigitalProductId”=hex:a4,00,00,00,03,00,00,00,36,39,38,33,31,2d,36,34,30,2d,\
31,37,38,30,35,37,37,2d,34,35,33,38,39,00,5a,00,00,00,41,32,32,2d,30,30,30,\
30,31,00,00,00,00,00,00,00,00,0d,04,89,b2,15,1b,c4,ee,62,4f,e6,64,6f,01,00,\
00,00,00,00,27,ed,85,43,a2,20,01,00,00,00,00,00,00,00,00,00,00,00,00,00,00,\
00,00,00,00,00,00,00,00,00,00,00,31,34,35,30,34,00,00,00,00,00,00,00,ce,0e,\
00,00,12,42,15,a0,00,08,00,00,87,01,00,00,00,00,00,00,00,00,00,00,00,00,00,\
00,00,00,00,00,00,00,00,00,00,00,00,00,00,00,00,00,94,a2,b3,ac
“LicenseInfo”=hex:9e,bf,09,d0,3a,76,a5,27,bb,f2,da,88,58,ce,58,e9,05,6b,0b,82,\
c3,74,ab,42,0d,fb,ee,c3,ea,57,d0,9d,67,a5,3d,6e,42,0d,60,c0,1a,70,24,46,16,\
0a,0a,ce,0d,b8,27,4a,46,53,f3,17
-----------------------------------------------------------------------------------------------
Then save it as .reg extension. For anyone didn't know how to save it as .reg. It simply like this, at Notepad go to "File" then "Save as..." and at the "Save as type:" choose "All Files" and at file name add extension at the end of file name. For example if you named it "IE7Crack", add ".reg" behind the name so it will be shown like this "IE7Crack.reg". Then before you install IE7, double click on the file you've saved and merged the Registry Entries(regedit).
The other way is simply edit the strings at "regedit" if you know how to add it to "regedit".
Make Money with Linkbucks
Example you post a comment to a discussion about slow internet connections. You know one site that provide the solutions. You convert the site link and put them in your post. I believe not one but perhaps billions of people will read your post and then clicked on the link you inserted in your post and then wallah!! You'll earn money from one single links.
Imagine if you have hundreds or thousands on links that actively clicked by internet surfers day by day. You'll make money just sitting at home. What the most important is, you must be creative to earn more.
Think how you can earn more from program like this. As you can see, I've tried the program and earned money for every month from Linkbucks. Even it is in beta, it is not a scam like others program. It is real money you can earn from links you can convert. To join the program, click on Linkbucks logo below...

I've give you the way, it is depending on yourself to use which 'highway' or 'shortcut' and this is proof what I've earn from linkbucks everyday, well it's just small amount for a starter, but worth than nothing, especially for non-scam online money making program like this....
Click here to read about some simple tricks to earn money with linkbucks...

This tutorial found through keywords:
How To Increase Internet Speed On Windows XP Professional
It seems that Windows XP reserves 20% of the available bandwidth (i.e. 20% of your Internet available speed) to itself and that is one of the reasons that you will never reach your full download speed under this operating system. In this short tutorial we will teach you how to fix this and improve your Internet speed. Please notice that this tip only works on Windows XP Professional. Also some people claim that this trick is pure myth. So I leave it here for you guys to test and see if it really increases your Internet performance or not.
In order to fix this just follow these easy steps:
1. Click on Start, Run, gpedit.msc,
2. On the window that will show up, click on Administrative Templates, Network, QoS Packet Scheduler.
| This image has been resized. Click this bar to view the full image. The original image is sized 801x572. |


It seems that Windows XP reserves 20% of the available bandwidth even if this option is not configured and even if you don’t use QoS (Quality of Service) feature (which is disabled by default).
Keep in mind that there are several other reasons for your download speed not reaching the labeled speed of your Internet connection such as:
- The labeled speed of your Internet connection is its maximum speed, not meaning that you will be able to always get that download speed. Your broadband operator only guarantees this speed between your home (or office) and their network.
- High traffic on your service provider network.
- High traffic on the server you are downloading a file.
- Speed limit on the server you are downloading a file (e.g. if the server has its download speed limited to 2 Mbps you won’t be able to reach a higher speed than that).
- Route from your home or office to the server where the file is located.
- Your Internet connection being shared with other computers at your home or office.
- Downloading several files at the same time with P2P programs, eating up part of the available bandwidth of your Internet.
Free Online File Conversion

Do you all know about zamzar.com? Zamzar.com, for those of you who don’t know, is a 100% free online file converter. Seriously, you can convert files, virtually any type of media or document up to 100MB, on the fly. All you need to do is simply upload the file to zamzar.com and give them an email address where the link for the converted file can be sent. Don’t wory anything about your e-mail address. No emails addresses are harvested, you’re not put on any spam lists. The most interesting about zamzar.com, no software is required to be downloaded to use the service.
Zamzar.com support :
- Document formats : Click Here
- Image formats : Click Here
- Music formats : Click Here
- Video formats : Click Here
- Compressed formats : Click Here
BitComet Modded for Fastest Torrent Download
![]()
BitTorrent is a peer-to-peer file sharing (P2P) communications protocol. BitTorrent is a method of distributing large amounts of data widely without the original distributor incurring the entire costs of hardware, hosting and bandwidth resources. Instead, when data is distributed using the BitTorrent protocol, each recipient supplies pieces of the data to newer recipients, reducing the cost and burden on any given individual source, providing redundancy against system problems, and reducing dependence on the original distributor.
The protocol is the brainchild of programmer Bram Cohen, who designed it in April 2001 and released a first implementation on 2 July 2001. It is now maintained by Cohen’s company BitTorrent, Inc. Usage of the protocol accounts for significant traffic on the Internet, but the precise amount has proven difficult to measure. There are numerous compatible BitTorrent clients, written in a variety of programming languages, and running on a variety of computing platforms.
The fastest way for file sharing/bittorent, i recommended you use to BitComet 0.66 Modded. It is the very good software for torrent. This software already been tweak and no need to install. It automatically bypass your portforward.
Reminder when use this software:
Use at your risk, dont blame me if anything happen to your pc. I used it so far excellent.!!!
Dont change anything except the download folder. I use My document as download folder. Dont too greedy when downloading… I always download not more than 5 files on one time.
No need install just click the program folder, then double click the BitComet 0.66 icon.
Try it and have fun..
Choose one of this link to download
mediafire.com : download link
files-upload.com : download link
rapidshare.com : download link
This tutorial found through keywords:
Bypass Megaupload Limit
Megaupload is a file hoster just like Rapidshare that has restrictions set in place for guests that are downloading files from their website. Everyone who wants to download a file from Megaupload has to wait a certain time before they can start the download. Another restriction is a so called country limit. If the maximum number of downloaders from a specific country has been reached all others from that country will have to wait until the amount of downloaders drops below that figure. The message : “All slots assigned to your country are in use”. Actually you can bypass the country limit wih download it’s toolbar, but the oolbar well known contains spyware that can harm your pc. Here I show you all how to bypass this country limit, without download it’s fucking toolbar…
Method 1 : For Firefox Users
- First, download and Install Megaupload SX.3.
- Go to Tools>Megaupload 3 and click Enabled.
- Now you can happy download without the message “All slots assigned to your country are in use.”
Method 2 : For All Browser
- Go to http://upandup.freehostia.com/accelerator.html
- Copy and paste file’s URL in “Address” bar
- Press “Start” button.
- Wait until download page appears, then enter the code for download.
- Limits and barriers will be removed automatically.
- After that you can download without that annoying message.
Method 3 : For Firefox Users
- Go to address bar and type: about:config
- On the Filter, search for general.useragent.extra.firefox
- Double click on it
- Change the default text with this: Firefox/2.0 MEGAUPLOAD 1.0
- Then you can start downloading.


